
Why Make This Recipe
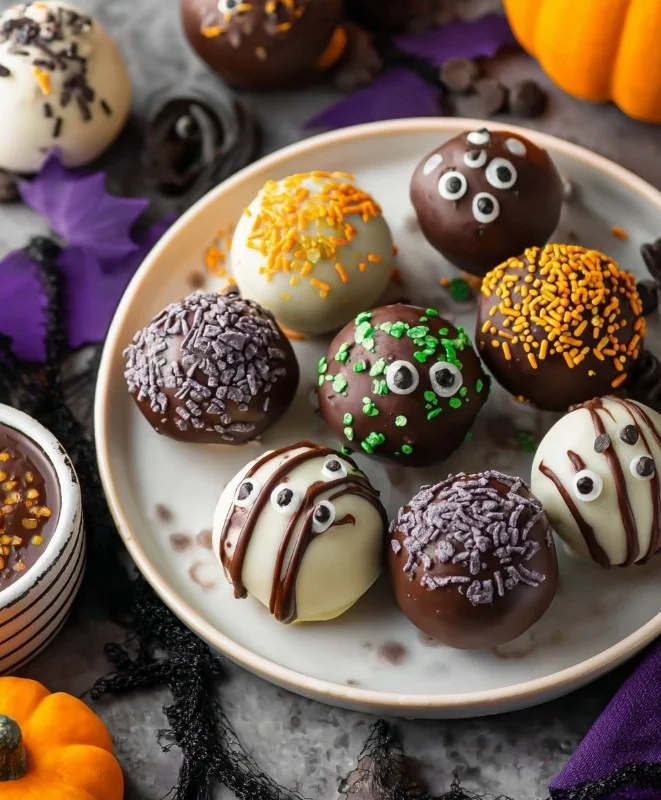
Halloween Oreo Balls are a fun and delicious treat perfect for the spooky season. These bite-sized delights are not only easy to make but also bring a festive vibe to any Halloween gathering. With their creamy center and chocolate coating, kids and adults alike will love them.
Making Halloween Oreo Balls allows for creativity in both appearance and flavor. You can customize the decorations to suit any Halloween theme or personal taste. They are quick to prepare and require minimal cooking skills, making them ideal for anyone looking to whip up a festive snack.
Equipment Needed for Halloween Oreo Balls
To make Halloween Oreo Balls, you will need some essential kitchen tools. Here’s what you need:
- Food processor
- Mixing bowl
- Rubber spatula
- Baking sheet
- Parchment paper
- Cookie scoop
- Microwave-safe bowl
What You Need to Make Halloween Oreo Balls
Gather the following ingredients to create these spooky treats:
- 36 Oreos
- 8 oz cream cheese (softened)
- 10 oz Ghirardelli Dark chocolate melting wafers
- 10 oz Ghirardelli White vanilla melting wafers
- Halloween sprinkles
- Eyeball candies (for decorating)
How to Cook Halloween Oreo Balls Step by Step
Start by adding the Oreos to a food processor and processing them into fine crumbs. This will form the base of your Oreo balls. Next, add the softened cream cheese to the food processor and pulse to combine fully.
Once combined, transfer the Oreo ball mixture to a mixing bowl. Use a rubber spatula to finish mixing the crumbs and cream cheese until everything is well combined.
Line a baking sheet with parchment paper for easy clean-up. Now, use a cookie scoop to place even portions of the Oreo ball mixture onto the baking sheet. After scooping, roll each portion into a ball using your hands. Once completed, chill the Oreo balls in the fridge or freezer for about 30 minutes.
While the balls chill, melt the dark chocolate melting wafers in a microwave-safe bowl until smooth. You can do this in short bursts, stirring in between to avoid burning. Dip half of the chilled Oreo balls in dark chocolate, ensuring they are well coated. Before the chocolate sets, top them with Halloween sprinkles for a festive look.
Next, melt the white vanilla wafers until creamy in a separate microwave-safe bowl. Dip the other half of the Oreo balls in the melted white wafers. Again, sprinkle with Halloween-themed toppings and add some eyeball candies for extra fun.
Once all the Oreo balls are dipped and decorated, chill them in the fridge until they firm up. Once they are solid, transfer the Halloween Oreo Balls to an airtight container for storage until you’re ready to enjoy them.
How to Make Halloween Oreo Balls
Making Halloween Oreo Balls is a simple and enjoyable process. Begin by processing the Oreos until they are finely crushed. This forms the main component of the treat. Combining the crumbs with softened cream cheese creates a rich, smooth mixture.
After rolling the mixture into balls, the lovely part comes: dipping and decorating! You’ll melt both dark and white chocolate, each offering a different flavor and appearance. After the balls are dipped, sprinkle them with colorful Halloween toppings, which makes them visually appealing for any spooky celebration.
The chill time is crucial for ensuring that the balls hold their shape when covered in chocolate. This recipe encourages you to have a little fun with the finished product by using creative toppings.
How to Serve Halloween Oreo Balls
Serving Halloween Oreo Balls is easy! Present them on a festive plate or a colorful Halloween-themed platter to draw the eye. These treats make a delightful addition to any Halloween gathering, whether it’s a party, a school event, or simply a fun snack at home.
You can also place them in treat bags tied with orange or black ribbons for party favors. Another great option is to put them in individual cupcake liners, making them easy to grab and go. Their bite-sized shape means they can be enjoyed with minimal fuss.
What to Serve with Halloween Oreo Balls
To create a complete Halloween treat table, serve the Oreo Balls alongside other festive snacks. Consider adding spooky cookies shaped like ghosts and pumpkins, fruit cups with creepy names, and ghostly cupcakes.
You might also want to include some spooky drinks, like a dark punch or coloring water with food dye for effect. Positioning the Oreo Balls near treats that share similar colors or themes enhances the visual appeal of your Halloween spread.
How to Store Halloween Oreo Balls
Store your Halloween Oreo Balls in an airtight container to maintain freshness. Keep them in the refrigerator, where they can last for up to two weeks if stored properly. However, they won’t last long once you start sharing them!
Take care to ensure they are layered with parchment paper if you plan to stack them. This prevents them from sticking together. For longer storage, you can freeze them for up to three months. Just separate layers with parchment paper before sealing them in a freezer-safe container.
Tips to Make Halloween Oreo Balls
To ensure perfectly shaped Oreo Balls, keep an eye on the mixture’s consistency. If it’s too crumbly, adding a bit more cream cheese can help. Remember to work quickly when dipping in chocolate so that it doesn’t harden too soon.
For a fun twist, try adding flavor extracts such as peppermint or orange to the cream cheese mixture for different taste variations. Also, experiment with different types of decoration based on your personal preference or holiday themes.
Variation
If you’re looking to mix things up a bit, consider replacing the Oreos with another type of cookie, like chocolate chip cookies or graham crackers. You can also substitute different types of chocolate coatings, such as milk chocolate or even white chocolate with food coloring.
Try rolling the balls in crushed nuts, coconut flakes, or cookie crumbs instead of sprinkles for a unique texture and flavor combination.
Best Time to Make Halloween Oreo Balls
Halloween Oreo Balls are best made a day or two before any Halloween festivities. This allows enough time for the flavors to meld together and ensures optimal firmness after chilling.
Making them ahead of time also means less last-minute stress. Just store them in an airtight container in the fridge. It’s always nice to have treats ready to go when guests arrive!
Common Mistakes to Avoid
One common mistake is not chilling the Oreo balls long enough before dipping. They can lose their shape when not firm. Be sure to chill the mixture for at least 30 minutes.
Another mistake is not finely crushing the Oreos. Larger cookie pieces can lead to uneven mixtures and make it difficult to roll into balls. Lastly, ensure melted chocolate is fully smooth. Any lumps can ruin the coating process and lead to a messy finish.
Nutritional Notes
These delicious treats are indulgent, so be mindful of portion sizes. Each ball contains Oreos and cream cheese, contributing sugar and fat. While they are a delightful treat, moderation is key. Consider sharing with friends and family to enjoy the fun without overindulging.
FAQs
Can I use reduced-fat cream cheese?
Yes, reduced-fat cream cheese works just fine. The overall texture may be slightly different, but it can still produce delicious results.
How can I make these gluten-free?
To make Halloween Oreo Balls gluten-free, switch to gluten-free Oreos, which are available at many grocery stores.
Can I use other types of chocolate or coatings?
Certainly! You can use any chocolate or coating that you prefer. Experimenting with white chocolate or different candy melts can yield exciting results.
Conclusion
Halloween Oreo Balls are an easy and delightful treat to celebrate the spooky season. With their combination of creamy, chocolaty goodness and festive decorations, they are sure to be a hit at any gathering. The simplicity of the recipe means there’s room for creativity, making it a fun project for families or friends to enjoy together. Don’t forget to have fun with the decorating and always be ready to share these tasty bites with the young and young at heart!