
why make this recipe
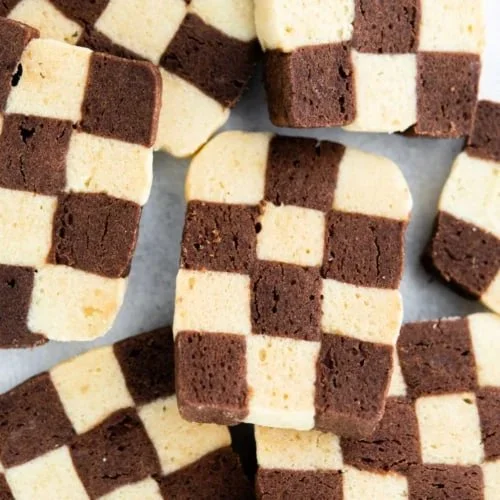
Checkerboard cookies are not just a treat for your taste buds; they also make a visual statement. Their unique pattern combines the classic flavors of vanilla and chocolate in a fun and engaging way, perfect for celebrations, gatherings, or just a cozy evening at home. Making these cookies can be a delightful activity to enjoy with family or friends, making memories while creating something delicious.
how to make Checkerboard Cookies
Ingredients:
- 3/4 cup unsalted butter (softened)
- 1 cup powdered sugar
- 2 large eggs
- 2 teaspoons vanilla extract
- 3 1/3 cups all-purpose flour (divided)
- 1 teaspoon kosher salt (divided)
- 3 Tablespoons unsweetened dark cocoa powder
- 1 egg white
Directions:
- In a mixing bowl, add the softened butter and powdered sugar. Beat at medium speed for about 2-3 minutes, scraping down the sides until the mixture is creamy.
- Beat in the eggs and vanilla extract.
- Divide the batter into two bowls. To one bowl, add 1 2/3 cup flour, 1/2 teaspoon salt, and all the cocoa powder. To the other bowl, add 1 2/3 cup flour and 1/2 teaspoon salt. Mix each bowl until a dough forms.
- Lightly dust your counter with flour. Drop the dough onto the counter and use plastic wrap to shape it into a rectangle about 1/4 inch thick. Repeat with the second bowl of cookie dough.
- Refrigerate the dough for 30 minutes.
- After chilling, cut the dough into strips about 1/2 inch wide using a sharp knife or pizza cutter.
- Gently beat the egg white, which will be used to stick the dough strips together. Take one strip of plain dough, brush it with egg white on one side, and attach a strip of chocolate dough next to it. Repeat this process so there are a total of 4 strips of dough on the bottom.
- On top of the bottom layer, repeat with alternating dough strips to create the checkerboard pattern. Stack the dough to create 3 rows.
- Wrap the stacked dough log with plastic wrap and chill for 2 1/2 hours (or up to 24 hours). You can also freeze it for up to 30 days.
- When you’re ready to bake, preheat the oven to 350 degrees F and line a cookie sheet with parchment paper.
- Unwrap the chilled dough and slice it into about 1/2 inch thick pieces. Place the cookies on the prepared cookie sheet, about 1 inch apart.
- Bake for 13-15 minutes, until the edges are lightly browned. Allow them to cool for 5 minutes on the cookie sheet, then transfer to a cooling rack to cool completely before serving.
how to serve Checkerboard Cookies
Checkerboard cookies are perfect on their own, but they can also be served with a glass of milk or a cup of coffee or tea. Arrange them on a pretty plate for a delightful dessert display. They can brighten up any dessert table at a party or be packed in a lunch box as a tasty treat.
how to store Checkerboard Cookies
Store the cookies in an airtight container at room temperature for up to a week. If you wish to keep them longer, you can freeze them. Make sure to place parchment paper between layers of cookies in the container to prevent sticking.
tips to make Checkerboard Cookies
- Ensure the butter is softened but not melted for the best texture.
- When rolling and cutting the dough, use a sharp knife or pizza cutter for clean edges.
- Don’t skip chilling the dough. This helps the cookies hold their shape while baking.
- Feel free to add a sprinkle of sea salt on top before baking for a delightful contrast.
variation
If you want to get creative, try adding different flavor extracts like almond or mint instead of vanilla. You can also experiment with adding colored sprinkles to the cookie dough for special occasions.
FAQs
Can I make Checkerboard Cookies without cocoa powder?
Yes, you can make all-vanilla cookies. Just skip the cocoa powder and increase the vanilla extract for flavor.
How can I make the cookies softer?
For softer cookies, take them out of the oven when they are just lightly browned on the edges and still soft in the center. They will firm up as they cool.
Can I use margarine instead of butter?
Yes, margarine can be used as a substitute for butter, but it may change the texture slightly. Use one that is low in water for the best results.