
Why Make This Recipe
Christmas Cookie Bars are a delightful treat that captures the spirit of the holiday season perfectly. These bars combine the flavors of traditional cookies in a convenient, easy-to-make form. You can enjoy them with family and friends, sharing the joy of home-baked goodies during holiday gatherings.
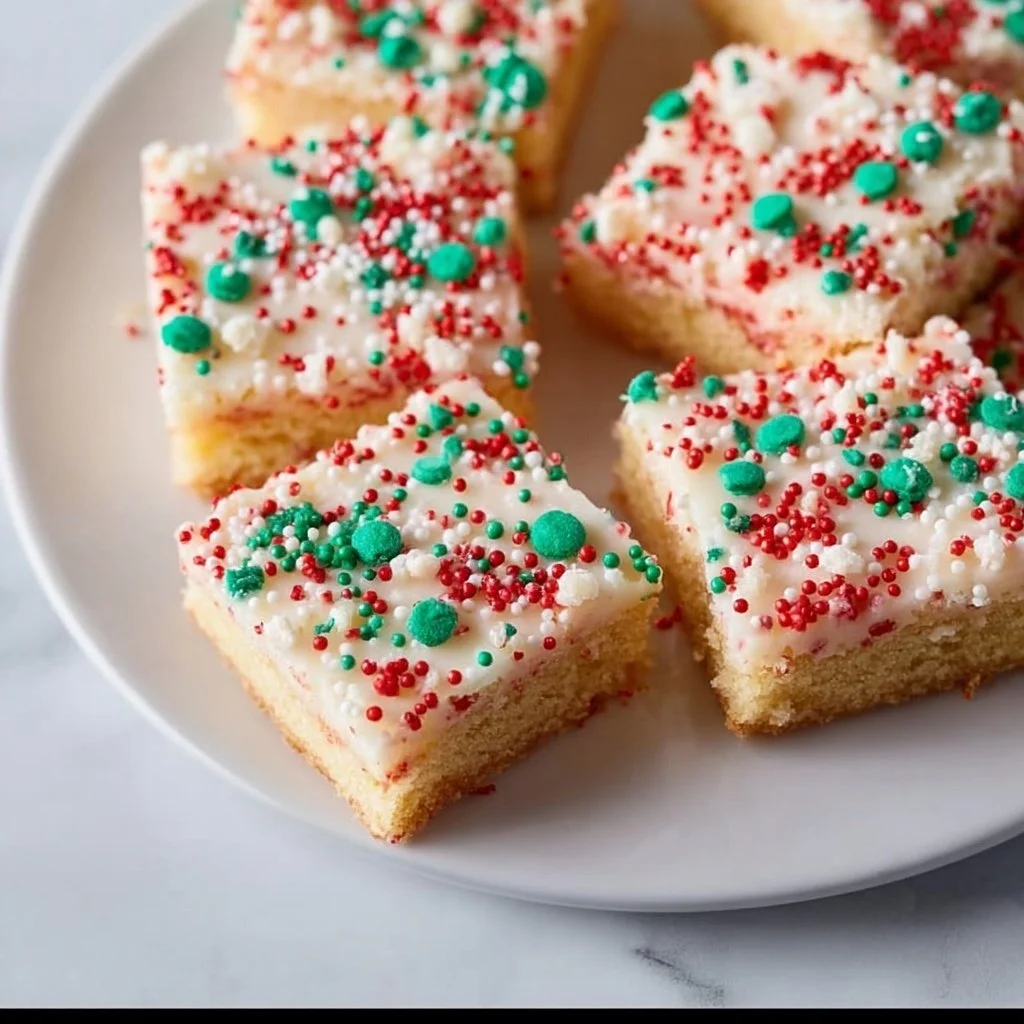
The vibrant colors and festive sprinkles make these cookie bars visually appealing. They bring a warm, inviting scent into the home, creating a cozy atmosphere that makes the holidays even more special. Whether for a party, a gift, or just a sweet treat for yourself, these cookie bars will surely spread cheer.
Equipment Needed for Christmas Cookie Bars
To make Christmas Cookie Bars, gather the following equipment:
- A 9×13-inch baking pan
- Mixing bowls
- An electric mixer or whisk
- Measuring cups and spoons
- A spatula
- A whisk
- An oven
What You Need to Make Christmas Cookie Bars
You will need the following ingredients:
1 cup (2 sticks) unsalted butter, softened
1 cup light brown sugar, packed
1/2 cup granulated sugar
2 large eggs
2 teaspoons vanilla extract
2 1/2 cups all-purpose flour
1 teaspoon baking soda
1/2 teaspoon salt
3/4 cup semi-sweet chocolate chips
1/2 cup unsalted butter, softened (for frosting)
2 1/2 cups powdered sugar
2 tablespoons milk or cream
1 teaspoon vanilla extract (for frosting)
Pinch of salt (for frosting)
Red, green, and white holiday sprinkles
How to Cook Christmas Cookie Bars Step by Step
Begin by preheating your oven to 350°F (175°C). Prepare a 9×13-inch baking pan by greasing it lightly or lining it with parchment paper for easier bar removal.
In a large mixing bowl, cream together the softened unsalted butter, light brown sugar, and granulated sugar. Use an electric mixer or a whisk to beat the mixture until it becomes light and fluffy. This step is essential as it ensures your bars have a nice texture.
Next, crack the two large eggs into the bowl, adding them one at a time and mixing thoroughly after each addition. This process helps incorporate air into the batter, making the bars light. Stir in the two teaspoons of vanilla extract to introduce a sweet aroma and flavor that complements the other ingredients.
In a separate bowl, whisk together the 2 1/2 cups of all-purpose flour, 1 teaspoon of baking soda, and 1/2 teaspoon of salt. Mixing the dry ingredients first helps evenly distribute the baking soda and salt, preventing any clumps in your final product. Gradually mix these dry ingredients into the wet mixture until just combined. Be careful not to overmix, as this can lead to denser bars.
Now, fold in the 3/4 cup of semi-sweet chocolate chips. The chocolate will melt slightly during baking, providing delicious gooey pockets in the finished bars. Once combined, spread the dough evenly into the prepared baking pan, smoothing the top with a spatula.
Bake the cookie bars in the preheated oven for 22 to 26 minutes or until they are golden brown. Keep an eye on them towards the end; every oven is different, and you want to avoid overbaking. Once done, remove the pan from the oven and allow it to cool completely.
While the bars are cooling, you can prepare the frosting. In a mixing bowl, beat the softened butter until smooth. Gradually add the 2 1/2 cups of powdered sugar, alternating with 2 tablespoons of milk or cream. This step helps ensure that your frosting comes together smoothly without lumps. After all the ingredients are mixed, add 1 teaspoon of vanilla extract and a pinch of salt. Beat until the frosting is light and fluffy.
Once the cookie bars have cooled, spread the frosting evenly over the top. To make these bars truly festive, add red, green, and white holiday sprinkles on top of the frosting, making them perfect for the season.
For a firmer frosting, place the bars in the refrigerator to chill for about 15 to 20 minutes. This will help set the frosting and make it easier to slice. After chilling, cut the bars into squares, serve them on a platter, and enjoy the smiles they bring.
How to Serve Christmas Cookie Bars
When serving Christmas Cookie Bars, consider presenting them on a festive platter or in a decorative tin. This adds to the holiday spirit and makes them look even more inviting. You can choose to serve them as is or warm them slightly in the microwave for a gooey cookie experience.
These cookie bars pair wonderfully with a glass of cold milk, hot cocoa, or even a warm cup of coffee. For an added touch, place some whipped cream or a dollop of ice cream on the side for those wanting an indulgent dessert.
What to Serve with Christmas Cookie Bars
Christmas Cookie Bars are versatile and can be paired with various treats and drinks. Here are some suggestions:
- Hot cocoa or eggnog for a festive beverage.
- Freshly brewed coffee or tea for a cozy pairing.
- Ice cream or whipped cream for those who enjoy a rich dessert.
- Seasonal fruits like cranberries or oranges to add freshness to the table.
The mix of flavors will delight your guests and create a wonderful holiday feast.
How to Store Christmas Cookie Bars
To keep your Christmas Cookie Bars fresh, store them in an airtight container at room temperature. If you plan to keep them for more than five days, consider refrigerating them to extend their shelf life.
When stored in the fridge, ensure the bars are fully cooled and wrapped well to prevent them from drying out. You can also freeze the bars for longer storage. Cut them into squares and wrap each piece individually in plastic wrap, then place them in a freezer-safe container or bag. They can be frozen for up to three months.
Tips to Make Christmas Cookie Bars
To ensure your Christmas Cookie Bars turn out perfectly, consider the following tips:
- Use room temperature ingredients: Ensure your butter and eggs are at room temperature for better mixing.
- Don’t overmix the batter after adding the flour: This helps keep the bars tender.
- Adjust baking time according to your oven: Start checking your bars a few minutes before the end time.
- Allow the bars to cool completely before frosting: This prevents the frosting from melting and mixing into the bars.
Variation of Christmas Cookie Bars
While the classic version of Christmas Cookie Bars is delightful, you can also consider some variations to keep things exciting:
- Swap the semi-sweet chocolate chips for white chocolate, butterscotch chips, or even peppermint chips for a festive twist.
- Add crushed nuts like walnuts or pecans for extra texture and flavor.
- Mix in dried fruits, such as cranberries or cherries, to add a chewy element and a pop of color.
These variations can suit different tastes and create unique holiday treats.
Best Time to Make Christmas Cookie Bars
The best time to make Christmas Cookie Bars is during the holiday season. These bars are perfect for holiday parties, cookie exchanges, or family gatherings. You might also want to whip them up for a cozy night in with loved ones or as an after-dinner treat on Christmas Eve.
The preparation is straightforward, making them an ideal choice for last-minute holiday baking.
Common Mistakes to Avoid
When making Christmas Cookie Bars, it’s easy to make a few common mistakes. Here are some to watch out for:
- Not measuring ingredients accurately: Use proper measuring cups and spoons to get the right amounts for the best results.
- Overbaking the bars: Keep a close eye on the baking time to avoid dry cookie bars.
- Skipping the cooling step before frosting: Frosting hot bars will lead to melted frosting and a messy finish.
- Forgetting to fold in the chocolate chips gently: This ensures an even distribution of chocolate without overworking the batter.
By avoiding these pitfalls, your cookie bars will turn out delicious every time.
Nutritional Notes
While Christmas Cookie Bars are a delightful treat, it’s essential to enjoy them in moderation due to their sweetness. Each bar contains ingredients like butter and sugar, which contribute to the calorie count. If you’re mindful of dietary restrictions, consider making smaller servings or exploring low-sugar alternatives for the frosting.
Checking the nutritional information of the ingredients used can also help you better understand the caloric content of your bars.
FAQs
How long can I store Christmas Cookie Bars?
You can store them in an airtight container at room temperature for up to five days. If refrigerated, they can last for a week or more. For longer storage, freeze them for up to three months.
Can I make these bars ahead of time?
Yes! You can prepare the bars a day or two in advance. Just be sure to store them properly and frost them before serving for the best experience.
Can I use gluten-free flour?
Absolutely! You can substitute regular flour with a gluten-free flour blend for a gluten-free version. Make sure to check the flour’s packaging for any adjustments needed in the recipe.
Conclusion
Christmas Cookie Bars are a simple yet delightful treat that captures the joy and spirit of the holiday season. With their sweet flavors, festive sprinkles, and convenient bars, they are perfect for sharing with loved ones. Whether you’re baking for a party, a gift, or just because, these cookie bars are sure to bring smiles and create cherished memories. Enjoy the warmth of the holidays by making and sharing these delicious bars with friends and family!