
Why make this recipe
Weeknight Tex-Mex Chicken Enchiladas are perfect for busy evenings when you want a tasty and satisfying meal without spending hours in the kitchen. This dish combines tender rotisserie chicken with flavorful sauce and melty cheese, all wrapped in warm tortillas. The recipe is simple to follow and can easily feed a family, making it a fantastic go-to option for weeknight dinners.
How to make Weeknight Tex-Mex Chicken Enchiladas
Ingredients
- 2 tbsp. olive oil
- 2 cloves garlic, chopped
- 3 chipotles in adobo, chopped
- 3 tbsp. tomato paste
- 1 tsp. ground cumin
- 1 tsp. chili powder
- 2 c. chicken stock
- 2 tbsp. corn starch
- 1 tbsp. apple cider vinegar
- Kosher salt
- 3 c. shredded rotisserie chicken
- 1/3 c. to 1/2 cup canola oil
- 12 corn tortillas
- 4 oz. cheese, grated (such as Monterey jack, Cheddar, or a combo of the two—about 1 cup)
- Fresh cilantro and sour cream, for serving
Directions
Make the Sauce
1. Heat olive oil in a medium saucepan over medium heat.
Begin by adding a drizzle of olive oil to a medium-sized saucepan and place it over medium heat. Allow the oil to warm gently until it shimmers but doesn’t smoke—this ensures it’s hot enough to bring out the full aroma of your ingredients. Olive oil adds a subtle richness and helps carry the flavors of the spices that come next. Using the right temperature at this stage is key to building a deep, flavorful base for your enchilada sauce.
2. Add chopped garlic, chipotles in adobo, and tomato paste. Cook while stirring often for about 2 to 3 minutes until the mixture is a dark maroon color.
Once the oil is ready, add your chopped garlic, chipotles in adobo, and tomato paste. Stir frequently to prevent burning and to let the ingredients meld together. As they cook, the tomato paste will deepen in color and the chipotles will release a smoky, spicy aroma that fills your kitchen. You’ll know this step is perfect when the mixture turns a deep maroon hue and smells rich and complex.
3. Stir in ground cumin and chili powder, then cook for another 30 seconds.
Sprinkle in the ground cumin and chili powder, stirring continuously to coat the mixture evenly. This brief toasting period—just about 30 seconds—helps the spices bloom, releasing their oils and intensifying their flavor. The cumin adds a warm, earthy depth, while the chili powder contributes heat and a subtle smokiness. This moment transforms your sauce from simple to restaurant-worthy.
4. Add chicken stock and bring the mixture to a simmer.
Carefully pour in the chicken stock, stirring as you go to loosen any bits stuck to the bottom of the pan. These caramelized bits, known as fond, are packed with flavor and will enrich the sauce beautifully. Bring the mixture up to a gentle simmer, allowing the ingredients to blend into a cohesive, fragrant base. You should see small bubbles breaking the surface, signaling that it’s ready for the next step.
5. Take 1/4 cup of the stock mixture and whisk in cornstarch in a bowl.
In a small bowl, scoop out about 1/4 cup of the hot liquid from your saucepan. Add the cornstarch and whisk until the mixture is smooth and lump-free. This quick step, known as making a slurry, ensures your sauce will thicken evenly without clumping. Doing this separately before adding it back to the pot gives you a silky, professional-quality sauce texture.
6. Return this slurry to the pot, stirring to combine. Bring to a boil, then reduce to a simmer and cook until slightly thickened, about 3 to 5 minutes.
Pour the cornstarch slurry back into the saucepan while stirring constantly to prevent lumps. Turn the heat up slightly and bring the sauce to a gentle boil—this activates the cornstarch and begins the thickening process. Once it starts to thicken, lower the heat and let it simmer for 3 to 5 minutes until the consistency is smooth and slightly glossy. The sauce should coat the back of a spoon without feeling heavy or sticky.
7. Stir in apple cider vinegar and season the sauce with salt.
When the sauce has reached the perfect thickness, add a splash of apple cider vinegar to brighten the flavors. This small touch balances the richness of the sauce and gives it a subtle tang that elevates the overall taste. Season with salt to your preference, stirring and tasting as you go until the flavors are well-rounded. The result should be savory, smoky, and just a little bit zesty.
8. Blend the mixture in a blender (remove the plastic cap and cover the opening with a dish towel) until smooth, about 30 seconds.
Carefully transfer the hot sauce to a blender, removing the center cap from the lid to allow steam to escape. Cover the opening with a clean dish towel and blend for about 30 seconds until completely smooth and velvety. Blending ensures a uniform texture and helps the flavors fully integrate. Be cautious with hot liquids—working in batches, if necessary, keeps things safe and mess-free.
9. Transfer 1/2 cup of the sauce to a bowl, add the shredded chicken, and toss to coat. Set the remaining sauce aside.
Spoon about half a cup of your freshly blended sauce into a separate bowl and add the shredded chicken. Toss well until every piece is coated with that rich, smoky sauce—this infuses the filling with deep, savory flavor. The rest of the sauce should be reserved for assembling and topping the enchiladas later. Cover it loosely to keep it warm while you move on to the next stage of preparation.
Make enchiladas:
1. Preheat the oven to 375°F (190°C).
Before you begin assembling your enchiladas, preheat your oven to 375°F (190°C) to ensure it reaches the right temperature for baking. Preheating allows for even cooking and helps the cheese melt perfectly later on. While the oven warms up, take a few minutes to prepare your workspace—lay out your ingredients, utensils, and baking dish so everything is within easy reach. This small step sets you up for a smooth and stress-free cooking process.
2. Spread half of the reserved sauce at the bottom of an 8-by-8-inch broiler-proof baking dish.
Pour half of your enchilada sauce into the baking dish, using a spatula or the back of a spoon to spread it evenly across the bottom. This layer not only prevents the tortillas from sticking to the dish but also infuses flavor from the very first bite. A thin, even coating works best—it creates a saucy base that helps keep your enchiladas moist during baking. Make sure to reserve the remaining sauce for topping later.
3. Heat 1/3 cup of canola oil in a medium non-stick skillet over medium heat.
Place your skillet on the stove and add the canola oil, letting it heat up gradually over medium heat. The oil should shimmer slightly when ready, but it shouldn’t smoke. Using canola oil gives the tortillas a light crisp without adding too much heaviness or altering the flavor. A non-stick skillet makes cleanup easier and prevents the tortillas from tearing during frying.
4. Fry each tortilla one at a time, turning once until they just begin to turn golden around the edges, about 1 minute. Add more oil if needed.
Working with one tortilla at a time, gently slide it into the hot oil. Let it cook for about 30 seconds per side, or until you notice the edges starting to turn golden and slightly crisp. The goal isn’t to fully fry them but to make them pliable and sturdy enough for rolling. If the oil level drops or the tortillas begin sticking, add a small splash of fresh oil to maintain consistency.
5. Transfer the tortillas to a paper towel-lined baking sheet to drain.
Once a tortilla is lightly fried, use tongs to lift it from the skillet and place it on a baking sheet lined with paper towels. This helps absorb any excess oil, keeping your enchiladas flavorful but not greasy. As they cool, stack them gently to prevent sticking, separating layers with paper towels if needed. This step ensures your tortillas stay soft yet firm enough for easy rolling later.
6. Divide the chicken mixture among the tortillas, roll them up, and place seam side down in the baking dish over the sauce.
Spoon a generous portion of your seasoned chicken mixture onto the center of each tortilla. Roll them tightly but carefully, making sure the filling stays enclosed. Arrange each rolled tortilla seam side down in the baking dish, nestling them close together so they hold their shape. This method keeps the enchiladas intact and allows the sauce to soak in beautifully during baking.
7. Pour the remaining sauce over the enchiladas and sprinkle the grated cheese on top. Cover the pan with aluminum foil.
Once all the enchiladas are neatly placed, pour the rest of your sauce evenly over the top. Don’t be shy—make sure every tortilla is covered for maximum flavor and moisture. Sprinkle the grated cheese over the sauced enchiladas, ensuring an even layer that will melt into a gooey, golden topping. Cover the dish tightly with aluminum foil to lock in heat and prevent the cheese from burning while baking.
8. Bake for 15 to 20 minutes until warmed through.
Place the covered dish in your preheated oven and bake for about 15 to 20 minutes, or until the enchiladas are hot all the way through. You’ll know they’re ready when the sauce starts to bubble gently around the edges. Baking allows all the flavors—from the sauce to the cheese—to meld together into a rich, comforting meal. The aroma filling your kitchen will be your best indicator that it’s almost time to serve.
9. Remove the foil and switch the oven to broil. Broil for 1 to 3 minutes, or until the cheese is golden brown.
Carefully remove the foil, then switch your oven to the broil setting. Let the enchiladas broil for 1 to 3 minutes, keeping a close eye on them as the cheese can brown quickly. This quick blast of heat creates a beautiful golden crust on top while keeping the inside tender and saucy. Once the cheese has melted to perfection and developed a slight crisp, remove the dish from the oven.
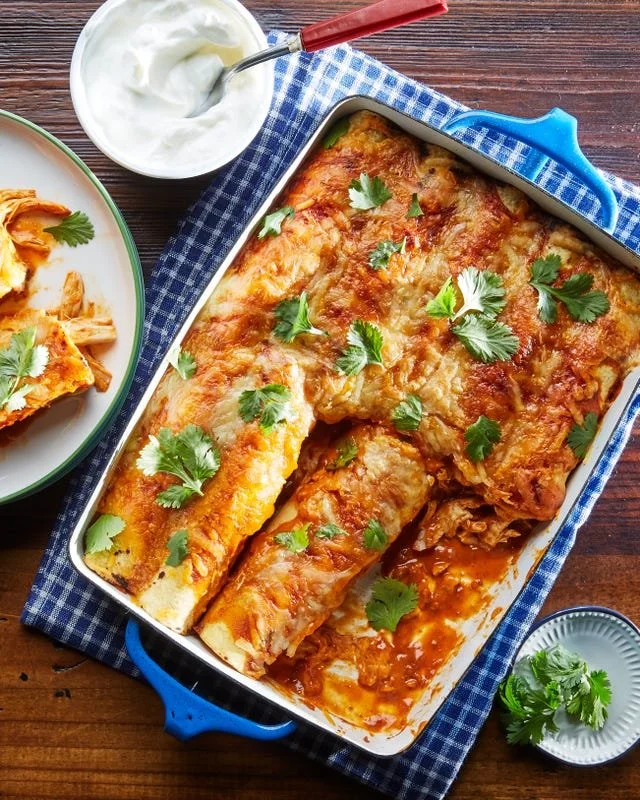
10. Serve with fresh cilantro and sour cream.
Allow the enchiladas to rest for a few minutes before serving—they’ll hold together better and be easier to plate. Garnish each serving with a sprinkle of fresh cilantro and a dollop of cool sour cream to balance the heat and richness of the dish. You can also add sliced avocado, a squeeze of lime, or diced onions for extra freshness. Serve immediately and enjoy your homemade enchiladas at their best!
How to serve Weeknight Tex-Mex Chicken Enchiladas
Serve these enchiladas hot, topped with fresh cilantro and a dollop of sour cream. You can also offer additional toppings like diced tomatoes, jalapeños, or avocado for extra flavor and texture. Pair with a side of Mexican rice or a simple salad for a complete meal.
How to store Weeknight Tex-Mex Chicken Enchiladas
To store leftovers, cover the enchiladas tightly with plastic wrap or aluminum foil. They can be kept in the refrigerator for up to 3 days. To reheat, place them in an oven at 350°F (175°C) until warmed through.
Tips to make Weeknight Tex-Mex Chicken Enchiladas
- Use rotisserie chicken for a quick and easy filling, but feel free to cook your own chicken if you prefer.
- If you want a milder sauce, reduce the number of chipotles or use just the adobo sauce.
- For a bit of crunch, add some sautéed bell peppers or onion to the chicken mixture.
variation
You can customize these enchiladas by changing the type of cheese or using different proteins like beef or black beans. Adding vegetables like spinach or zucchini can also enhance the dish.
FAQs
Can I make these enchiladas ahead of time?
Yes, you can assemble the enchiladas in advance and store them in the refrigerator. Just bake them when you are ready to eat.What can I substitute for tortillas?
You can use flour tortillas or even make a low-carb version using zucchini slices.Is this recipe spicy?
The level of spice can vary based on the chipotles used. You can adjust the amount or omit them for a milder flavor.